
This resource isn't just a page of recipes (though there are lots of those!). It’s a space for us to share our zero waste approach to toiletries and cleaning products. This approach has:
- Saved us so much money;
- Cut out all packaging waste and recycling from the toiletries and cleaners we use;
- Led us to rethink what we believed was ‘essential’, with ripple effects in other areas of our life;
- Often led to improved results for our bodies and cleaning (not always, haha);
- Given us control over the ingredients in the stuff we put on our body and in our home;
- Connected us with awesome local businesses that are innovating to do the right thing; and
- Delighted us with the creative/discovery aspect inherent in learning how to make everyday cleaners and toiletries.
These wins haven’t just come from DIY recipes, which is why we share a little more than that on this page. These wins have also come from us rethinking our perspectives on toiletries and cleaners, combined with a systematic process of replacing products with better alternatives.
Jump straight to reading about the specific products we have replaced, and how, by clicking here (or by using the contents in the left sidebar). Otherwise, read on to learn more about what we mean by rethinking our approach and attitude to toiletries and cleaning products.
The Big Rethink!
These days, most toiletries and cleaners on the market:
- Come in single-use packaging
- Are pretty darn expensive, even the “budget” brands
- May contain harmful ingredients that aren't fully removed by wastewater treatment plants and end up as pollution in the natural environment, such as emerging organic contaminants.
- May contain ingredients that are known to be unsafe for human health, or haven’t been shown to be safe.
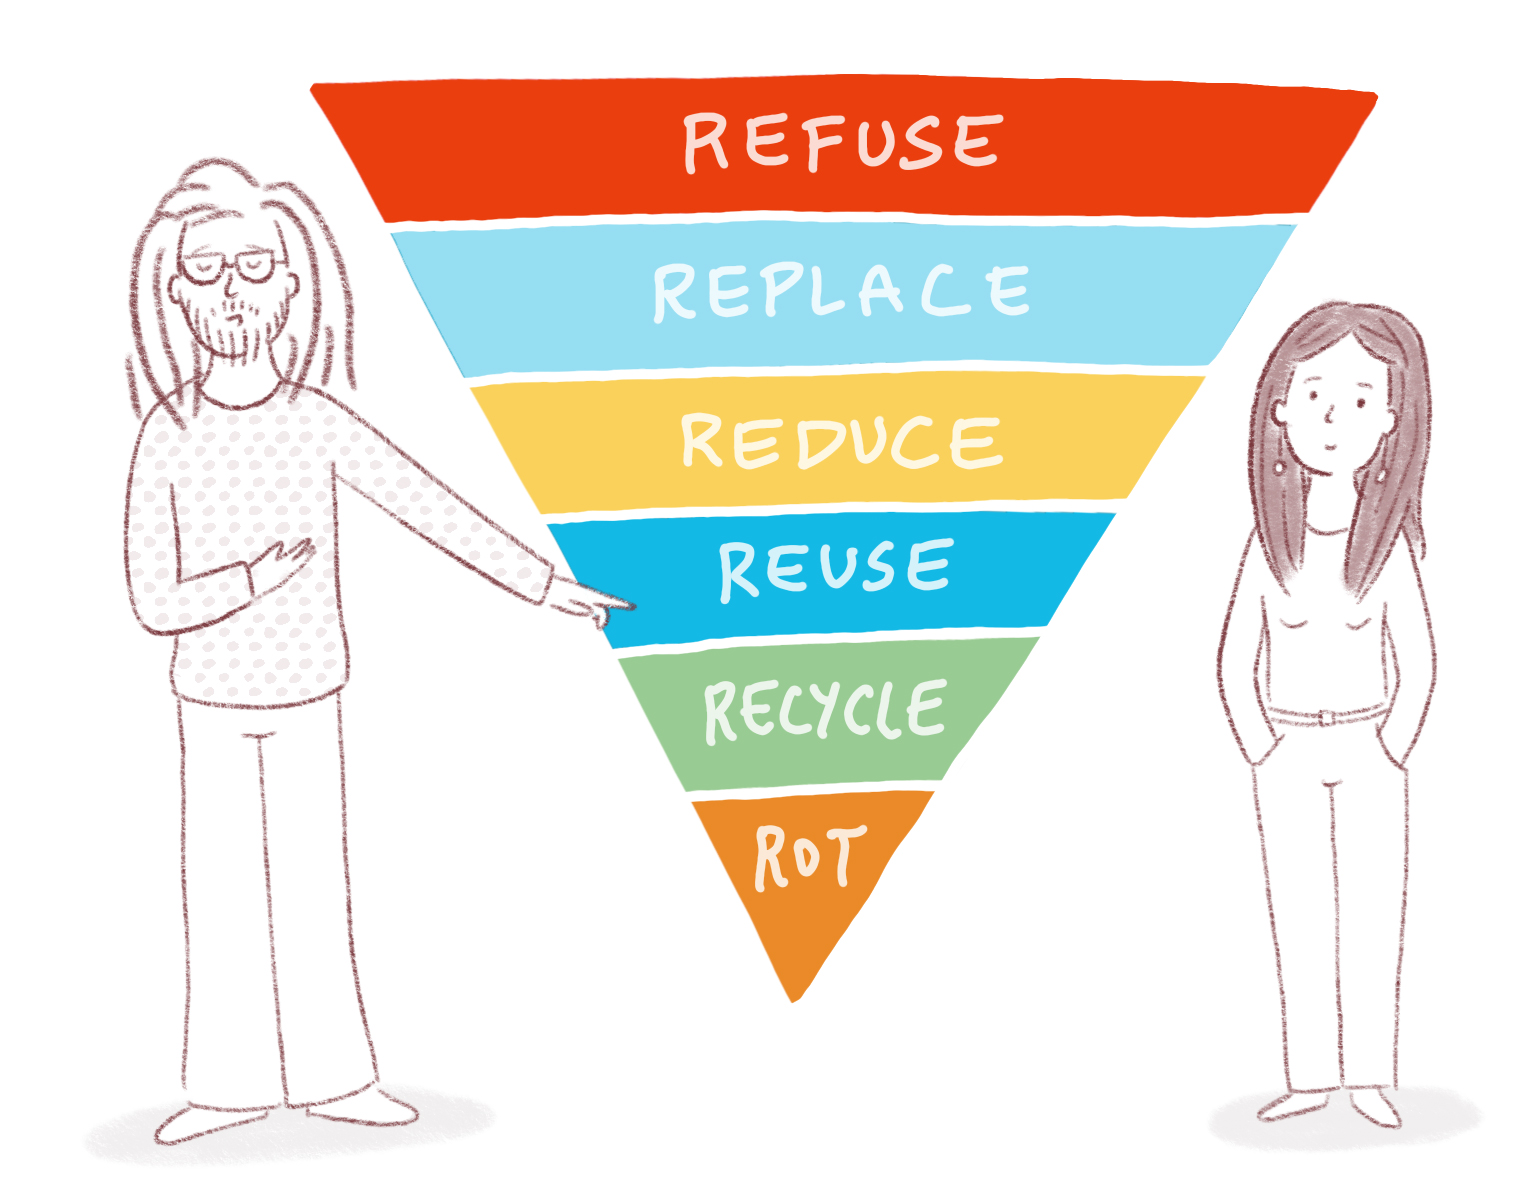
The 6Rs and the 3 step process
As zero wasters, we approach the problem of wasteful products by applying the 6Rs (otherwise known as the “waste hierarchy”), which helps us to prioritise where to put our limited time, energy and financial resources. Our goal is to do better in a way that gets us the most bang for our buck - i.e. minimum effort for maximum impact.
The waste hierarchy says: Refuse, Replace, Reduce, Reuse, Recycle, Rot, and only in that order.
Recycle is quite far down the list because more environmental gains come from us rethinking what, how and why we buy stuff. So, even if a particular bathroom or cleaning product comes in recyclable packaging, we first ask whether we can:
- Refuse the product or the packaged item
- Replace it with a zero waste alternative
- Reduce the packaging footprint of the item by finding the product in reusable packaging (and/or reduce how much we use the product).
The answer is almost always “yes!”
In practice, we answer these questions through an easy, three-step process:
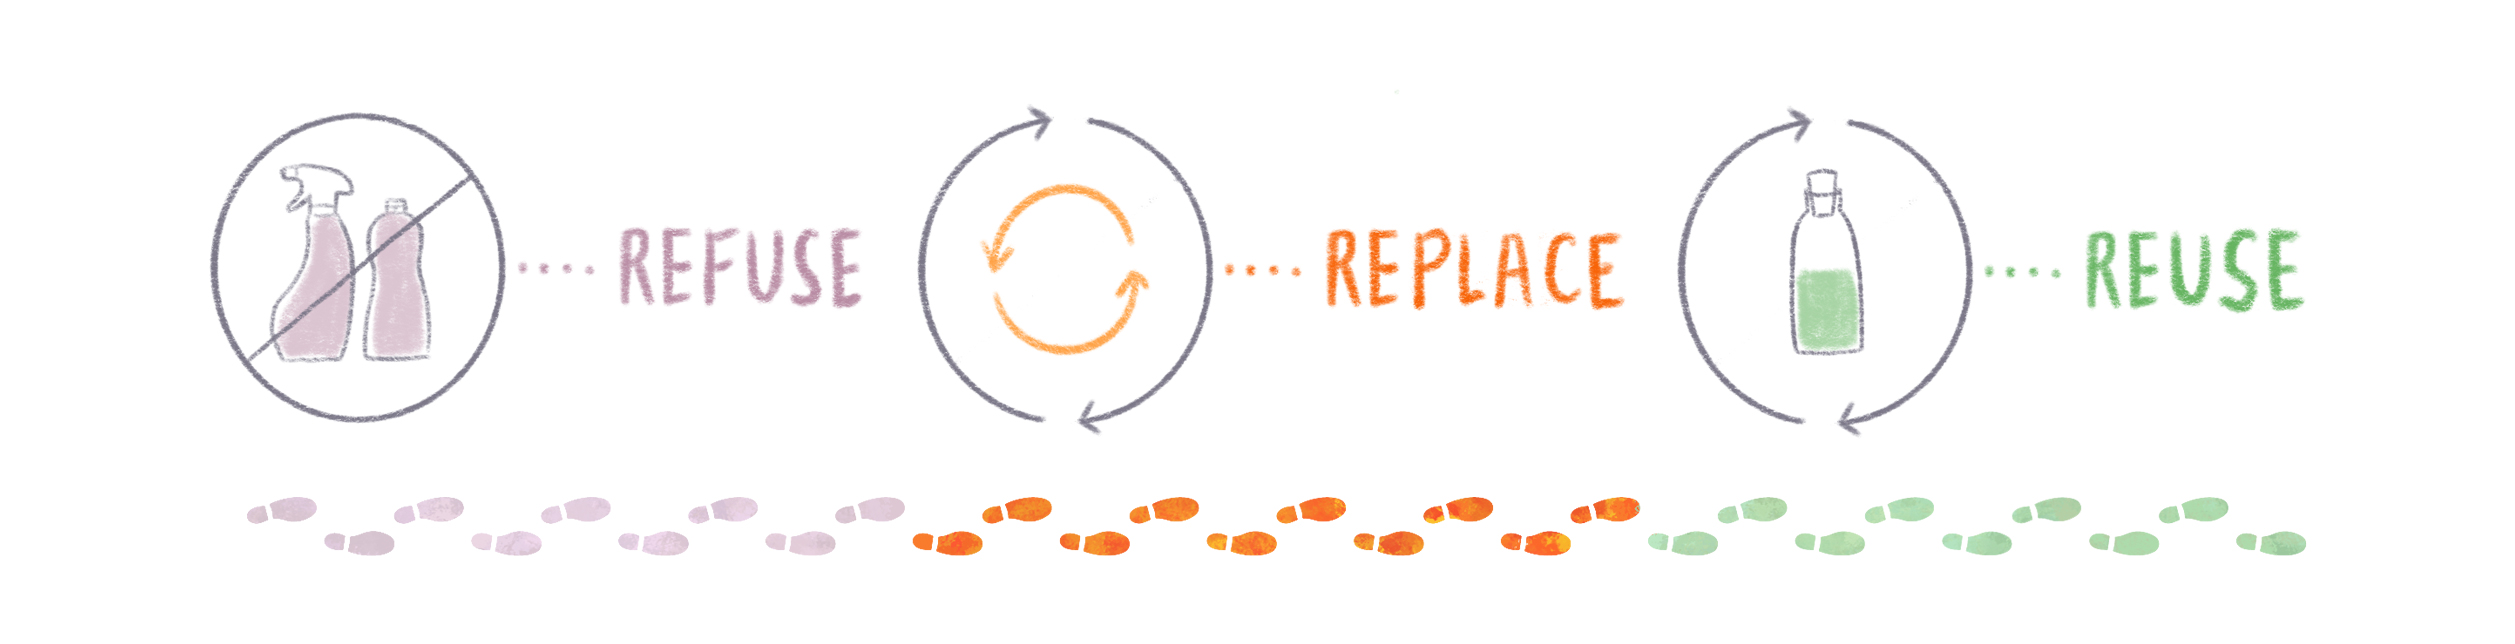
Step 1 – Refuse: Do I really need this?
We went through all the products we were using, or could use, and asked whether we actually needed them at all. For example, did we really need a cupboard full of many different cleaning products for each and every corner of our house? Or countless different care products for every inch of our body?
If the answer to this question was “no, I do not need this”, then all we needed to do next was make a mental note not to replace that product when we ran out of it. Hey presto, problem solved, without spending a cent of our money or any further seconds of our time.
Step 2 – Replace: How else can I get this product without the waste?
When we went through Step 1, there were a handful of products that we reckoned we did still need. So, Step 2 meant working out how to replace them with a less wasteful alternative. Most of the time, the replacement was to make these products ourselves, at home, with simple, inexpensive ingredients that we buy from bulk bins/refill stations or in reusable packaging. Hey presto, problem solved. You can find the recipes we use below.
Step 3 – Reuse: Is this product available in reusable packaging?
For the products we don’t make ourselves, we have hunted out alternatives made by local New Zealand companies who run reusable packaging systems. These products can be more expensive than store bought products from big companies, but the slight cost increase from this small number of products we buy is more than offset by the savings we have made from simplifying what we “need” in the first place, and then making the rest of the stuff ourselves. You can read about some of the toiletries/cleaners out there that come in reusable packaging below.
Expectations management
The other part of “The Big Rethink” is to manage your expectations about toiletries and cleaning products. This involves being realistic, patient and flexible.

Be realistic about the results that can be achieved while aiming to walk more lightly on the planet – there’s a reason why so many harsh ingredients are used in toiletries and cleaners: they get results that gentler products generally can’t. When you manage your expectations about your DIY cleaning paste, you may end up being pleasantly surprised by how effective it actually is, rather than outraged that it doesn’t live up to something made in a lab.
Be realistic about how much it costs small, local businesses to produce ecologically benign products packaged in reusables. It shouldn’t come as a surprise that companies who go out of their way to make an effective product that is also kind to the planet have to charge a bit more than the budget big box brand at the supermarket. In fact, when you stop to think about it, you might be surprised at how small the price difference actually is. This is because a lot of these companies absorb the higher costs to make their amazing products by taking this out of their profit margin, rather than passing it on to the consumer. Of course, even when you recognise this reality, that doesn't change the fact that some products might still be out of your budget. However, we've found that by thinking about our cleaning/beauty routine more holistically, we've found ways to cut costs elsewhere that have enabled us to pay a little bit more for the products we do still buy.
Be flexible with our recipes and patient with your body - the recipes that we share in this post are recipes that work for us, but you might need to tweak them to work for you. For example, when it comes to toiletries, everybody’s body is different – e.g. your skin might be naturally dry (ours is on the oily side) or your hair might be curly (Hannah’s is straight, Liam’s… dreaded) – so be prepared for a little trial, error and adaptation, or to do further research to find recipes that are perfect for you. Having said that, when trialling our toiletries recipes (or other recipes), don’t give up too soon if you don’t get instant results. Your body may need time to adapt to toiletries with simpler ingredients, and there may be a transition phase before you get optimal results, especially if you have been using store bought products up until you switch.
Be flexible with our recipes to suit your cleaning needs - Everybody has different expectations around the level of performance they want from cleaning products. Some of these expectations are psychological (e.g. only feeling comfortable if dishwashing soap produces visible bubbles or surface cleaners produce strong, bleach-type smells), some expectations reflect needs that arise from your specific context (e.g. you work in a surgical theatre and need to disinfect the surgery between patients). So, again, it’s up to you to determine if a particular recipe will satisfy your expectations and/or if a DIY product is appropriate for your needs.
Be open to changing your cleaning routine - Getting the most out of DIY cleaning products often requires a rethink of your cleaning process. Generally speaking, effective cleaning requires the happy trio of:
- Heat
- Scrubbing power
- Cleaning agent
These need to be in balance to get a good clean. If you reduce the power of one, you'll likely have to increase the power of the others to get a similar cleaning result. Modern cleaning products are often made for machines (e.g. washing machines) that don’t have the same scrubbing power as a human hand. Many of us are also trying to reduce energy usage by doing cold water washes. This has led to harsher cleaning agents in store-bought cleaners to compensate for the drop in scrubbing power and heat. What this means is that if you are using homemade cleaners, where the cleaning power of the ingredients are likely softer than many store bought products, you should consider increasing water temperature and/or elbow grease to get similar cleaning results.
Replace and Reuse by product categories
This section covers Steps 2 and 3 of our easy three-step process described in The Big Rethink above, which combines tips and tricks for replacing conventional store-bought products, including recipes and better product options if you'd rather buy than DIY. The section is divided between toiletries and cleaning products, with each set out in alphabetical order (you can also go straight to the product you're interested in, by using the contents bar on the left). Please note three things:
1) We can only share what we know, so we've limited this post to the products that we need for our life and household. If you can’t find what you are looking for, that’ll be why.
2) The recipes that we share are what work for us. Hopefully they are a useful starting point for you, but they might not be the end point! You may need or want to tweak the recipes to suit your body or your expectations/needs around cleaning. The recipes are by no means the only ones out there, nor even the best recipes. They’re just the ones that work for us.
3) We don’t really use essential oils for our toiletries and cleaners, for the reasons outlined in this post, but if you want to, you can.
Toiletries (alphabetical)

Deodorant
Our recipe:
Mix together:
- 2 parts baking soda
- 1 part corn starch (or arrowroot or tapioca starch)
- 1 part oil (we use a neutral coloured oil like sunflower oil, but you can use basically any oil)
To use: apply a pea sized amount under each arm.
Pros: cheap as chips, takes about 1 minute to make, works for us!
Cons: not an antiperspirant so you still sweat, which can stain your clothes (FYI it’s not the oil in the deodorant staining your clothes, it’s the sweat interacting with the deodorant, which happens with store bought products too); some people find baking soda irritating on their skin (if this is you, we recommend reducing the amount of baking soda in the recipe and replacing it with more starch).
Extra notes about deodorant
In the past, we used coconut oil as the oil in our deodorant recipe, but we switched to sunflower oil because:
- We can access NZ grown sunflower oil on tap in Wellington. Coconut oil isn’t made in NZ and it’s harder to find in refill formats – it’s usually prepackaged into single-use jars.
- Coconut oil goes hard when it’s cold, which makes applying the deodorant marginally more annoying in winter.
- We don’t actually cook with coconut oil, so we were only buying it for deodorant, which seemed silly. If you have coconut oil in your kitchen anyway, then this wouldn’t be an issue for you!
If you don’t want to make your own deodorant, several small companies around New Zealand sell their deodorant by refill or package into glass jars that they accept back, sanitise and refill (usually these options are available in retailers local to the manufacturer, so you may need to ask around to find the most local option for you, check our Zero Waste Shopping Guides, or go visit your local zero waste grocer/refillery). Several companies also package deodorant into cardboard tubes that you can compost when empty, check our Zero Waste Shopping Guides to find some options closest to you.

Facial cleanser
No recipe, we just the oil-cleansing method, simply:
- Dampen your face with warm water.
- Put 3 drops of a non-comedogenic oil into the palm of your hand
- Gently rub the oil over your damp face.
- Cover your face for about 30 seconds (or until you need to breathe) with a flannel that’s been run under a hot tap so it’s warm.
- Remove the flannel and, as you do, gently rub your face with the flannel to remove any excess oil.
Extra notes about the oil-cleansing method
- Choose your oil carefully based on the comedogenic rating (and ideally also what is available locally, on refill!). The comedogenic rating is a rating of 1 – 5. Oils with a higher rating can clog your pores and cause a break out. If you have naturally oily skin, go for oils with a rating of 0 or 1. If your skin is naturally dry, you'll probably be fine with an oil rated 2 (like olive oil). Use an oil rated higher than 2 to cleanse your face at your own peril!
- We both have naturally oily skin, so we use either sunflower oil or hempseed oil, which are the two low comedogenic oils that we can access on tap that are also NZ-grown. To find what’s available in your local area, check our Zero Waste Shopping Guides.
- We use the oil-cleansing method as an ‘all-in-one’ facial product, for cleansing, make-up removal, as well as moisturising. Some people find they need to combine oil-cleansing with a follow-up product to ‘lock-in’ hydration for extra moisturising – this could include things like beeswax or honey. We haven’t found the need to do this, so you might want to do more research on effective DIY moisturisers if this is something you’d like.

Shampoo (wet)
We use NZ-grown pea or rye flour to wash our hair. All you do is:
- Take one heaping tablespoon of pea/rye flour
- Mix it with just enough water so that it resembles the consistency of shampoo (or, instead of water, you can use leftover coffee, lemon juice, apple cider vinegar - these add a conditioning effect, but can also help to cleanse if you have hard water).
- Use it just like normal shampoo.
We make the shampoo as and when we need it - it takes about 30 seconds to make. Don’t make up a batch in advance, it’ll go off (or become a sourdough starter).
Extra notes about shampoo (wet)
- If you have hard water (i.e. with high levels of minerals like lime, calcium etc.) then it can help to do an acidic rinse before you do the shampoo. This helps to stop the minerals creating a waxy residue build up on your hair, which really sucks. We use a splash of apple cider vinegar, diluted with water. Basically, get in the shower, wet your head, then pour the diluted vinegar water all over your wet head. Leave for a minute or so, wash out, then apply the shampoo. We only do this acidic rinse step when the water is hard.
- We used to use rye flour exclusively rather than pea flour. Rye flour cleanses just as well, but the reason we switched to pea flour is that pea flour is much easier to wash out (rye flour can leave flakes, or even chunks, in your hair if you don’t rinse thoroughly – lol!)
- Some people use baking soda for shampoo. We don’t recommend this because it’s very alkaline. When you are washing your hair, you are actually washing your scalp. Human scalps are naturally acidic. The alkaline in the baking soda throws things out of whack and can cause irritation and also dry out your hair.
- It’s likely to take time for your scalp to adjust to “no-poo” if you've been using store-bought shampoo. The way most store-bought shampoos work, they strip the natural oils from your scalp, so your scalp overproduces oil to compensate, leading to the greasy factor. When you go cold turkey with things like rye/pea flour, there’s a period of time where your scalp continues to overproduce oil and there’s nothing stripping it away (this isn’t the case for everyone, but it was for us because we have naturally greasy scalps!!). We experienced a transition period of about six weeks where we looked like Professor Snape. Perhaps time this transition for winter when you get to wear hats, or any other occasions (lockdowns??) where you aren’t required to present yourself to other human beings ;-)
- If DIY shampoo sounds all too alarming, consider buying liquid shampoo on tap from a refill station and BYO bottle, or replacing your liquid shampoo with a shampoo bar. There are loads of shampoo refill stations around the country and gazillions of bar shampoos on the market (see our Zero Waste Shopping Guides for some of the options near you). If you go for a shampoo bar, FYI it might take some trial and error to find one that works for you. Also, remember that these bars must be able to fully dry out quickly between uses or they will melt away much before their time. So, investing in a Block Dock that enables bars to dry quickly could save you money in the long term, if you reckon that shampoo bars will be your go-to shampoo option.

Shampoo (dry)
No recipe, just corn, arrowroot or tapioca starch. Optional addition is some cocoa powder, if you have dark hair, like Hannah.
- Apply the starch directly to the roots of your hair, i.e. close to your scalp, where it’s most greasy. You can put this in an upcycled jar with a sprinkley lid (e.g. a former parmesan jar) and sprinkle it over your head, although it's easier and less messy to use a make-up brush.
- Leave in your hair for about 10 minutes then either brush it out or just rustle your hair about with your hands.
- Pros: cheap as chips, saves hair washing time, doubles as bronzer if you mix with the right amount of cocoa powder to suit your skin tone, and adds volume to hair, which is great if you have limp and lifeless hair (like Hannah).
- Cons: doesn’t work if you can’t brush your hair, i.e. if you have dreadlocks (sorry, Liam!), also sometimes the cocoa can leave a faintly unpleasant smell if it’s not super fresh.
Extra notes about dry shampoo
- Hannah uses dry shampoo because she tries not to wash her hair more than once a week. By about day 4 her hair will be starting to get greasy. She can get an extra couple of days before needing a full hair wash, by using dry shampoo.
- If you don’t want to DIY dry shampoo, there are companies who make dry shampoo and package it into cardboard tubes that you can compost when empty, (check our Zero Waste Shopping Guides for some of the options near you).

Toothpaste
No recipe, we just use food-grade baking soda as a toothpaste powder, and then a couple of days a week we use fluorinated toothpaste tablets by Solid that we can buy locally, on refill.
We keep the baking soda in a jar in the bathroom (we don’t share jars – we have one jar each). When we brush our teeth, we wet the head of the toothbrush first, then dip it in the baking soda, then brush as normal.
- Pros: ridiculously cheap, baking soda is a natural whitener and it’s gentle on teeth (it’s not true that baking soda is too abrasive for teeth, actually it’s less abrasive than pretty much any toothpaste you can buy).
- Cons: it tastes like salt (you get used to it), it is not fluorinated (that’s why we use fluorinated tooth tablets a couple of days a week – we don’t use them full time for cost reasons).
Extra notes about toothpaste
- The toothpaste tablets we use are made in New Zealand by Solid. We can buy these tablets locally on refill, but if you're further afield, Solid also takes their jars back, sanitises and refills them. Read more about their glass jar return programme on their website.
- If you hate the salty taste of baking soda, or want more of a paste, then you can mix 2 parts baking soda with one part coconut oil and add a couple of drops of essential oil (we recommend spearmint, not peppermint, because it’s gentler and also child friendly). If you are using essential oil, we recommend adding the coconut oil to dilute the essential oil, otherwise you would be adding the essential oil neat to your teeth, which is probably not a great idea. If you are using coconut oil, consider spitting it out outside in your garden or into your compost because coconut oil can block the pipes when it solidifies!
- If you don’t want to make toothpaste, but want a full-time zero waste product (whether tablets or an actual toothpaste), we recommend Solid products (they don't just make toothpaste tablets and they operate their glass jar return programme for ALL their products, and some stockists of their products also have toothpaste dispensing machines - you can BYO jar!!).
Cleaning Products (alphabetical)
Before we get into our tips and tricks, if you'd like some really excellent cleaning products recipes (way better than ours), you should totally check out the recipes by Figgy & Co (local creators of non-toxic cleaning products in Paraparaumu) - they rock!

Citrus all-purpose cleaning spray
- Requires white vinegar, citrus peels, and a bit of time (that's time to leave the citrus peels on the vinegar for 3+ weeks, not actual making time). You also need an upcycled spray bottle to put the finished product into.
- Find the recipe/process here.

Cleaning paste aka jif aka
everything cleaner
We use Figgy and Co’s cleaning paste recipe, which is the absolute bomb. We use this cleaning paste to clean so many things and it’s amazing.
We do adapt the Figgy recipe slightly, in that we use grated soap that we dissolve into a “liquid” with a bit of boiling water, rather than buying liquid soap – seems to work just fine. We also don’t add essential oils (saves money and effort to skip these, and most of the time the soap we are using already has a fragrance anyway).

Dishwashing
- We use dish soap bars that we swish around (and store) in an old reusable net produce bag, and we scrub away with a wooden dishbrush.
- FYI that we wash dishes by hand - if you're after dishwasher machine recipes, check the Figgy and Co recipes.
Extra notes about dishwashing
- There are lots of companies in New Zealand that make dish soap bars now, including Korukai, Zero Natural, Veto, and Pure Blend. Check our Zero Waste Shopping Guides for some of the options closest to you.
- We put the dish soap bar in an old reusable net produce bag. We get the running water hot, put the plug in the sink, swish the bar around in the hot water for a bit to get bubbles and until the water in the sink feels “slippery”. We then hang up the bar in the bag straight away to dry out.
- We wash dishes with our wooden dish brush, which we also hang up to dry out between uses, otherwise it will fall apart before it’s time (failing to hang up a wooden dish brush between uses is a rookie error lots of people make).
- Note, it’s best to use a bar specifically made to wash dishes, rather than a generalist bar like Sunlight Soap. This is because generalist bars tend to have a higher fat content that can leave streaks/greasy residues on your dishes. While that higher fat content means they are moisturising when you use them to wash your hands, you don’t need (or want) to moisturise your dishes.
- To use your dishsoap bar and to store it between uses, you can also invest in a metal soap shaker rather than using an old cotton bag. They definitely work better than the cotton bag we use (easier to shake the soap around vigorously) and they allow the soap to dry out faster, which means the bar lasts longer. Plus they also look better. If you just want a more effective drying rack for your dishsoap bar rather than a soapshaker, you could invest in a Block Dock.
- If you don’t like using dish soap bars, but you still want a low-waste option, you can buy dishwashing liquid on tap and BYO bottle to fill. See our Zero Waste Shopping Guides for options closest to you.
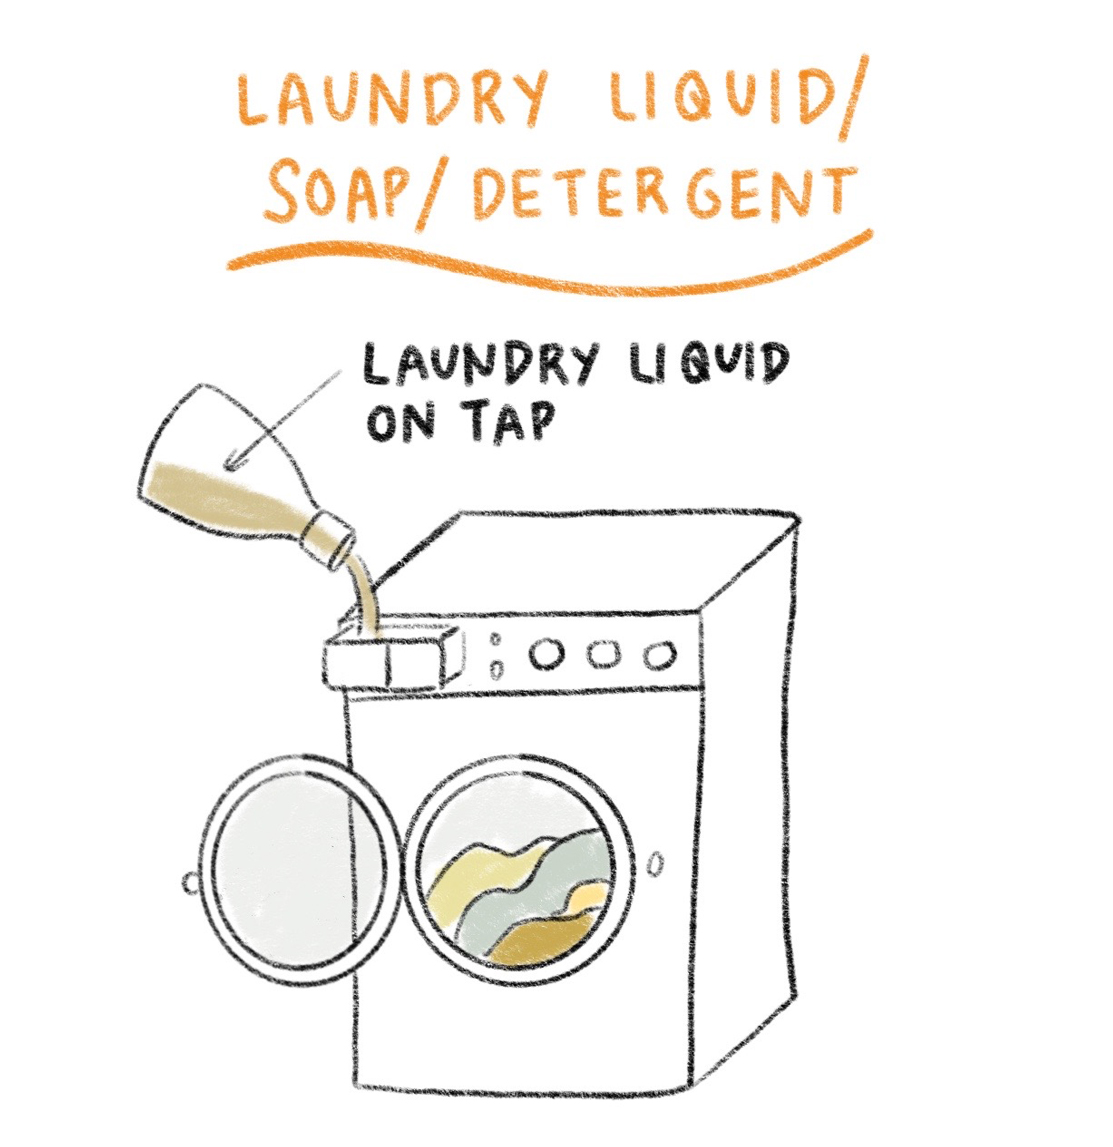
Laundry liquid
- We buy laundry liquid on tap from our local zero waste/refillery store, specifically choosing the products of companies that we know take back the bulk containers and refill them, including Zero Refill, Littlefoot and Conscious. Check out our Zero Waste Shopping Guides to find the closest option to you.
Extra notes about laundry liquid
- We don’t make our own laundry powder because DIY laundry recipes usually require grated soap, which we’ve heard isn’t super great for washing machines. We do have plans to build a pushbike-powered washing machine - when we do that, then we will make our own laundry powder ;-)
- Laundry liquid is arguably better for machines. We find it easiest to buy laundry liquid than to make our own.
- Eco products made by companies that also take back their bulk containers to wash and refill usually cost more, which makes sense because it’s more labour-intensive to do this, in addition to the courier costs to get empty bulk containers back. Considering what it costs these companies to do the right thing, we reckon the final price difference isn’t actually that much more expensive. We can justify the extra cost because this is one of the few toiletry/cleaning products we buy.

Window cleaner
- No recipe, we just use white vinegar.
- To ensure no streaks, use old newspaper rather than a cloth to wipe the window/mirror down with. You can then compost the vinegary newspaper after use.